Avaya IP Office 6+ - Active Connection
These instructions help you configure your Avaya IP Office 6+ phone system to work with TIM Plus. Contact your system maintainer if you are not familiar with the configuration of your PBX.
Support files
Ensure the following support files exist in the /config/ folder of the TIM Plus application:
Avaya IP Office 6+.TDS
Avaya IP Office 6+.TDT
Contents
Configure the SMDR output
You may need to purchase a license to enable SMDR on this PBX. Please speak to your system maintainer if you are unsure.
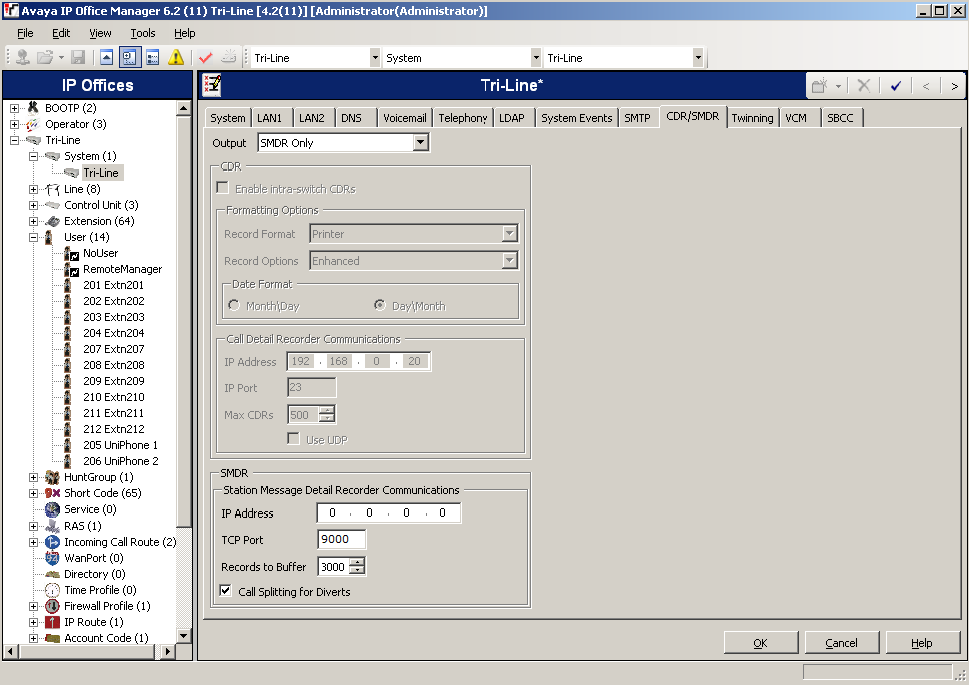
The Avaya IP Office can be configured to accept an incoming TCP connection, in order to output its SMDR data. Using the Avaya IP Office Manager application, perform the following steps to enable the output:
Log in to your Avaya IP Office unit using the Avaya IP Office Manager.
Click on
Systemfrom the left-hand menu and select your Avaya IP Office unit.On the right-hand side, click on the
CDR/SMDRtab.From the
Outputdrop-down menu, select SMDR only. TheSMDRsection will now become active at the bottom of the page.In the IP
Addressfield, enter 0.0.0.0.In the
TCP Portfield, enter the port number that you want your SMDR data to be sent to. You can use any free TCP port, but we would recommend one in the 9000 range.In the
Records to Bufferoption, increase the value to the maximum available.Check the
Call Splitting for Divertsoption.Click on the
OKbutton, then save and merge the configuration for the settings to take effect.
Here is an example of the SMDR screen and how it should be configured:
Configure TIM Plus
Follow the steps below to configure TIM Plus to connect to your Avaya IP Office 6+:
- Click on the
Directorytab. - If you don't have a site set up, press
Addand selectPBXfrom the drop-down menu. In the dialogue window, name your site and then selectAdd. - Locate the site object you want to configure in the Directory, click on it and select
Properties.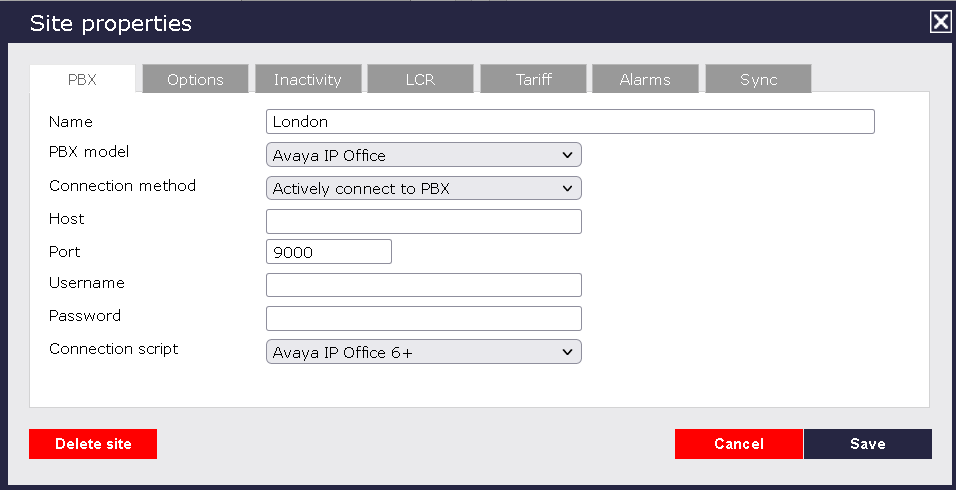
- In the Site Properties window, select Avaya IP Office from the PBX model drop-down list.
- In the Connection method field, select Actively connect to PBX from the drop-down list.
- In the Host field, enter the IP address of your Avaya IP Office.
- In the Port field, enter the port number configured in the phone system.
- Leave the Username and Password fields blank.
- In the Connection script field, select Avaya IP Office from the drop-down list.
- Click on the 'Options' tab and tick the Keep a local backup of any data tickbox, as shown below

- Click on the
Savebutton to apply the settings.